Shower plumbing design help Grohe 34122 thermo valve

Plumbing Forums

Help Support Plumbing Forums:

This site may earn a commission from merchant affiliate links, including eBay, Amazon, and others.

How many side heads should I use?

  • 1 Side head?

    Votes: 0 0.0%
  • 2 Side heads?

    Votes: 0 0.0%
  • 3 Side Heads?

    Votes: 1 100.0%
  • 4 side Heads?

    Votes: 0 0.0%

  • Total voters
    1

elkski

Member
Joined
Aug 20, 2018
Messages
22
Reaction score
0
Location
84092
first post here.
I am getting close to building my new steam shower using many plumbing fixtures that I salvaged from a spa maybe 8-10 years ago.,
I will be using the Schluter system for tiling and have a thread on John bridge. not sure if i am ok to post links here?

THe shower will be 48 x 62 x 98 size well under my steam gen size.
I was going to go curbless with a linear drain in the center. 2" and it connects to a vent stack 33" away.

I don't recall how these parts I have came out of the two steam showers and two small showers that I demoed.

I just identified the valve (calling Grohe USA), I have as a Grohe 34122 valve. It was plumbed up using both top and bottom outlets as i know from just removing the 1/2" fittings copper and pipes stubs from my cutting.
I cant find flowrate for this valve on the grohe site.. it shows a retail price of 730$ and discontinued.

https://www.grohe.us/en_us/thermostat-rough-in-valve-34122000.html

I also have two flow control valves
I have 4 moen 2.5 GPM side Jets
3 Moen 2.5 GPM rain heads. I think just 1 is best but was going with 2 until i think my flowrate is 12GPM @ 60PSI.
I ordered a Grohe diverter valve and Relexa slide bar shower head and wall adapter.
https://www.amazon.com/gp/product/B000YOYP08/?tag=skimlinks_replacement-20

I understand I need a flow control valve after this 34122 temp control valve.
The Grohe lady told me max of 72PSI inlet pressure, I need to measure.. Does anyone lower the whole house or do I need a reg on both hot and cold supply? This house may be 80+PSI?? I do have a regulator for the whole house. The house is 3 floors and regulator on bottom floor. so 24' to upstairs

I found this guide that may be related to that Therm valve I have or not?
http://www.kasales.net/documents/Installation and Troubleshooting Grohe.pdf

My plan was for the line going to the far wall side heads to slope down so it will drain out and not give a cold initial shot. I also am considering putting this side jets on the one main control wall. Please give me your opinion on this. Maybe i need another diverter to select between the two top heads" but the valve and trim another 400$ its Geneva brushed nickel
 

Attachments

  • IMG_20180820_114637.jpg
    IMG_20180820_114637.jpg
    2.3 MB · Views: 13
  • IMG_20180817_142511.jpg
    IMG_20180817_142511.jpg
    1.3 MB · Views: 11
Last edited by a moderator:
All designers and framers should have to try to assemble a gaggle of shower comooncomp to understand a plumbers puzzle.

I wanted the on off valve close to the door in the right side. Hopefully you had the hand shower selected on the diveeter when you shut things down.
I guess the thermostat valve won't be used to often. The hot water gets to this location in 10-20 seconds so the on/off valves Will be the main things. The bench is 14" but I think standing will tend to straddle the lineae drain. Maybe 3" to the right or 27" from the back wall. Will probably be using 3/4" PEX to main valves on to flow control valves.

The tape in the pictures is 6' from the floor. The 36" metal rule is floor. Therm valve up 46"

I don't think I have really made a balance loop for the 4 side soray heads.
 

Attachments

  • IMG_20180820_151410.jpg
    IMG_20180820_151410.jpg
    3 MB · Views: 21
  • IMG_20180820_151624.jpg
    IMG_20180820_151624.jpg
    1.3 MB · Views: 14
Last edited:
The plumber will probably want to use pex. Where do I order the moen mounting tee's for the side heads? The ones with the nice brackets. I dont think they are the S1300 ones as I want to just want pex inlet and outlet and 1/2 NFPT to put a brass 1/2" pipe stub out that my heads will mount to.
 
Last edited:
if my 2.5 GPM side heads cause to much flow i can always replace them with 1.5 GPM heads.
My question is if i use a threaded angle in the wall for my side head balance loop how do you remove the head and make sure this threaded connection deep in the wall isn't the one that is unscrewing? If I leave the stub out short you wont be able to get a wrench on the nipple.
 
Stub out nipples are assembled using an internal nipple wrench, when needed.
The Moen body sprays you have do not allow but 1/8" of depth adjustment - good luck with that- it is a bad design to have only tiny depth adjustment. Nipples come in 1/2" increments, so it is fk'd up to use impossibly poorly designed product in such a setting.
As far as where to order mounting tees, your plumber will source them.
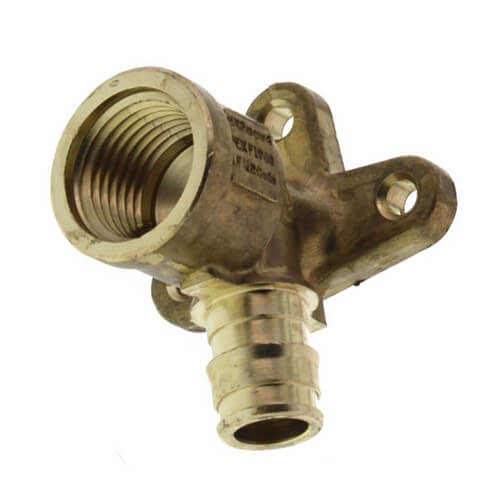
Pex type drop-ears use a three hole layout but I like the ProPress six hole for real security.
 
I figured I have 3/4" leeway. I was going to determine exactly the depth to install my risers. Based on tile selection, and plumbing tee or elbow I find. I see the PEX elbows with 2 mounting ears. And the ones called 3 hole press in with 2 tabs. I am used to missile tolerances so I think I can handle this if I get the parts rounded up. I may install the plumbling fixtures as I build my wall and then have plumber just pex them. i dont think i could manage 1/8"adjustability but the escutchion is like 1/2" and the riser has a 5/8" round part on the shaft. The kerdi tile thin set combo is biggest variable. But I'm the tile man.
With these pictures do I have the moen heads you thought with only 1/8 adjustment?
 

Attachments

  • IMG_20180821_150015.jpg
    IMG_20180821_150015.jpg
    1.2 MB · Views: 6
  • IMG_20180821_150057.jpg
    IMG_20180821_150057.jpg
    678.2 KB · Views: 6
Last edited:
Your photo looks like you DO have more leeway than the Moen I had worked with in the olden days. If that escutcheon slides, you are good to go.

This photo is a three hole pex adapter. This particular photo is Uponor ProPex, which is the "expansion" type of connector.
I do not recommend two hole adapters with pex, not enough triangulation.
Even with three hole, we always use a pipe strap close by the connection point.
My son has been an aerospace CNC machinist, so I know what you speak of in terms of tolerances.

I love Grohe in general, and the reps here in N. California are the best, but I wish their volume controls had screw holes to utilize. You essentially need to use a bracket on each end of the valve and have an extra set of hands holding it to set pipe straps.
Also know, you will get water hammer from slamming the valve closed quickly.
It is a hydraulic phenomenon of those valves, no matter how well they are strapped. You could use water hammer arrestors at each valve, or just close them slightly slowly and it won't occur.
Test it yourself before you close up the wall and you will see what I mean.

lf4235050-4.jpg
 
Yes tge trim slides. It's funny you mentioned water hammer. No where in this 3 story house dies it happen but this bathroom. Even the moen sink faucets did it. And the other day the toilet suppks did it. Yes I was rubbing my chin on mounting these Grohe flow valves. Using copper was one idea. I will probably have a plywood backing plate in the wall.
Let me measure water pressure. You won't believe me if I tell you my presure. I did consider doing a test plumbingo set up.

First I measured oressure outside as it's under regulated. It was 108 psi. Down a floor in baswmeba it was 112 psi at what I thought was regulated hose bib. And a solid 112 psi at bottom of water heater.
 
Last edited:
Hmmmm. Was it a regulator failure ?
Should I try to adjust it?. Man I'm going to hate my flows at 72 psi.
 

Attachments

  • IMG_20180821_173523.jpg
    IMG_20180821_173523.jpg
    958.2 KB · Views: 8
I adjusted the regulator this AM.. it seems to go down to 70 PSI but the bolt is almost all the way in.? I'm sure this hasn't been serviced since install in 98'
IT seems quite sensitive in adjustment.
I don't really notice any different flow rate in the kitchen sink which I use so much. I was expecting big disappointment.

Do you think I should buy some service parts and service this regulator?
 
Looking at my valve wall. The drain vent is 32" from the wall can I divert it over 10" and back? I would move the stud. This is like a puzzle.
New appreciation for plumbers
 

Attachments

  • IMG_20180822_103659.jpg
    IMG_20180822_103659.jpg
    789.9 KB · Views: 13
Last edited:
Thanks Tom,.

Well I am slowly slipping into the plumber job. Bought a PEX crimper tool today and enough fittings to cut out my old 1/2 copper at the hvac room and I'm going to put 3/4" valves on the basement service. I bought what I think I need for the ABS drsin tie ins. For shower, kitchen sink, and washer/dryer and steam shower kaundyl sink.
 
well I finally got the the shower plumbing today and it took two of us all day and I am afraid i made 2 mistakes. I did not follow my original plumbing layout.. I should have looked at it or re read the Grohe technical information this morning. The manual says I did two things incorrectly.

I installed the volume control valves with the arrow pointing downward. the tech manual says this may result in shower head leaking. It seems like a valve is a valve and when its off its off?
Next I installed the attachment point for the handheld shower hose below the temp control balancing valve .. unless the hose is laying on the shower floor it seems like the head height would be whats important. Other than those two issues that would require a complete redo things went fairly well.

The rain line on the left is not complete it will go up
 

Attachments

  • IMG_20190104_193112760.jpg
    IMG_20190104_193112760.jpg
    3.8 MB · Views: 34
  • 1546657865577.jpg
    1546657865577.jpg
    153.6 KB · Views: 28
Last edited:
Here are some things in the technical paper. I did 3/4" PEX up untill volume control valve per convo with grohe tech.
 

Attachments

  • IMG_20190104_230616.jpg
    IMG_20190104_230616.jpg
    2.4 MB · Views: 7
  • IMG_20190104_230859.jpg
    IMG_20190104_230859.jpg
    2.2 MB · Views: 8
  • IMG_20190104_231032.jpg
    IMG_20190104_231032.jpg
    2.3 MB · Views: 8
  • IMG_20190104_231057.jpg
    IMG_20190104_231057.jpg
    2.6 MB · Views: 8
UMMMMM......I am a firm believer in remodeling and customizing a home with the RESALE value of the addition in my thinking. I guess I am just weird
If you detour from the norm in the placement of the shower fixtures in a shower unit. You risk alienating a certain number of prospective buyers,
BUT, If you install using a ADA guide line, you can then sell the home later for bigger bucks as it is now ada compliant
those are just my personal thoughts,
anyway. here are the valve and shower head placement measurements for an ada complaint shower

ADA%20accessories%20configuration4038.png
 
I thought I had posted that the whole house regulator had failed I replaced it and set it at 55 PSI per Grohe tech rep but can raise it later if needed.

I do have hand support bars in my shed I salvaged. Why does ADA care where handheld shower hose outlet comes out of the wall? Where I mounted my hose attachment still sllows the hose and head to go everywhere.
That ADA guildline is a good idea. But how to do if I have a temperature balance valve that needs a separate on off volume control valve? Plus a diverter valve for rain head or hose head? Plus a on off volume control for side heads on opposite wall?
 
https://www.cedengineering.com/userfiles/ADA Accessibility Guidelines.pdf

I'm having trouble finding a good ADA guide for multiple control valves.. i did find this that says control valves located 38-48" high. I am in this zone.

I also don't understand how a on/off volume control valve can result in a shower drip if it is installed with inlet on the top rather than at bottom? It seems like a valve seal should shut off in any orientation?? Is this a Grohe specific thing? These valves are 10-15 year old valves.

I know temperature control valves are sensitive to inlet pressure but I dont see how it matters if the shower hose outlet stub out is above or below this valve. if flow control valve is off what difference does it make?

I guess I need to learn about stacking?

One more thing is it crazy to try to reuse some of these pex fittings? I have cut off a couple rings and it is not an easy thing but at 2-4$ a part it may be worth it.
 

Latest posts

Back
Top