JimB12345
Member
Hi, I'm replacing a burst (it was a frost-free, but I left the hose connected) outdoor faucet with a new frost-free. Interior piping is CPVC.
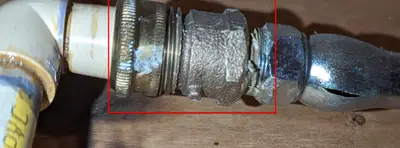
The old connection was with a CPVC to FHT (female hose thread) union on the house side, and a MPT to MHT (male hose thread) adapter on the faucet side. The connection is 'accessible' but in the basement, I feel like this type of connection maybe isn't appropriate to just depend on the rubber washer to maintain a seal indefinitely? My understanding is that gasketed unions should only be used in 'accessible' locations; you could argue that this is accessible, but since it's inside the home and in the basement, if it were to spring a leak it could be some time before it's discovered.

I'm planning to use threaded connections with a CPVC to stainless FPT adapter to connect the house piping directly to the NPT on the new faucet, with thread sealant. (Due to the short length of CPVC remaining (see pic) I assume I'll have to cut out the elbow and replace with new so I can attach the adapter.)
Does this plan make sense? I am assuming electrolysis between dissimilar metals (SS and copper or brass) should not be an issue since nothing here is grounded, is that correct? Or is anything else wrong with this plan?
Related, I am also concerned about "stressing" the existing CPVC when I screw in the faucet, any tips on getting them 'mostly aligned' so I don't have to stress the existing piping? I was thinking of making alignment marks on the new adapter vs. faucet after doing a dry test-fit prior to installation, but I'm not sure how many extra degrees of turn beyond 'feeling snug' I will get once the tape and sealant is applied for the final install.
Thank you!
The old connection was with a CPVC to FHT (female hose thread) union on the house side, and a MPT to MHT (male hose thread) adapter on the faucet side. The connection is 'accessible' but in the basement, I feel like this type of connection maybe isn't appropriate to just depend on the rubber washer to maintain a seal indefinitely? My understanding is that gasketed unions should only be used in 'accessible' locations; you could argue that this is accessible, but since it's inside the home and in the basement, if it were to spring a leak it could be some time before it's discovered.

I'm planning to use threaded connections with a CPVC to stainless FPT adapter to connect the house piping directly to the NPT on the new faucet, with thread sealant. (Due to the short length of CPVC remaining (see pic) I assume I'll have to cut out the elbow and replace with new so I can attach the adapter.)
Does this plan make sense? I am assuming electrolysis between dissimilar metals (SS and copper or brass) should not be an issue since nothing here is grounded, is that correct? Or is anything else wrong with this plan?
Related, I am also concerned about "stressing" the existing CPVC when I screw in the faucet, any tips on getting them 'mostly aligned' so I don't have to stress the existing piping? I was thinking of making alignment marks on the new adapter vs. faucet after doing a dry test-fit prior to installation, but I'm not sure how many extra degrees of turn beyond 'feeling snug' I will get once the tape and sealant is applied for the final install.
Thank you!


