Converting sink drain to tub

Plumbing Forums

Help Support Plumbing Forums:

This site may earn a commission from merchant affiliate links, including eBay, Amazon, and others.
I removed the old cast iron soil pipe and replaced it with PVC.

Installing cast iron is a great idea!:cool:
 
I myself would go to your local big box hardware store and purchase a thin piece of flat stock steel that covers the pipe from floor to ceiling. You are only talking ~$15-$20 max.
 
Sorry to resurrect this thread, but as the question pertains to the same project... what the heck.

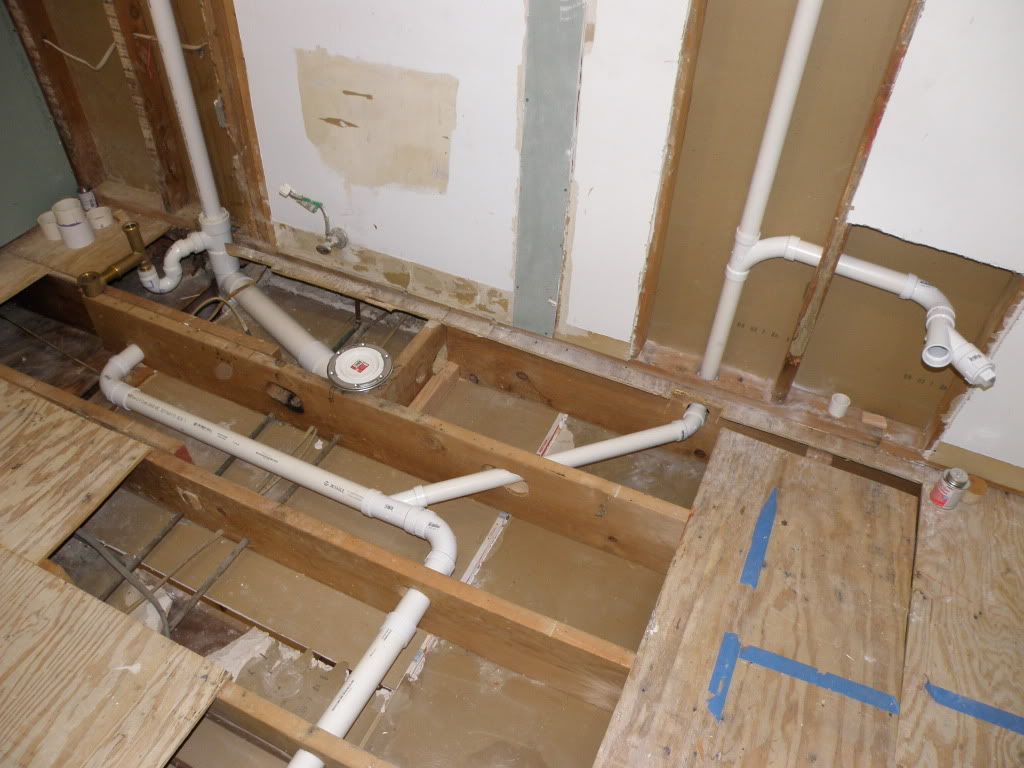
The problem is the toilet drain. Even after the effort to replace the old cast iron soil pipe with PVC, the toilet is only being moved approx 1 inch to the right of the old position.

Here is a good view:

P7150008.jpg


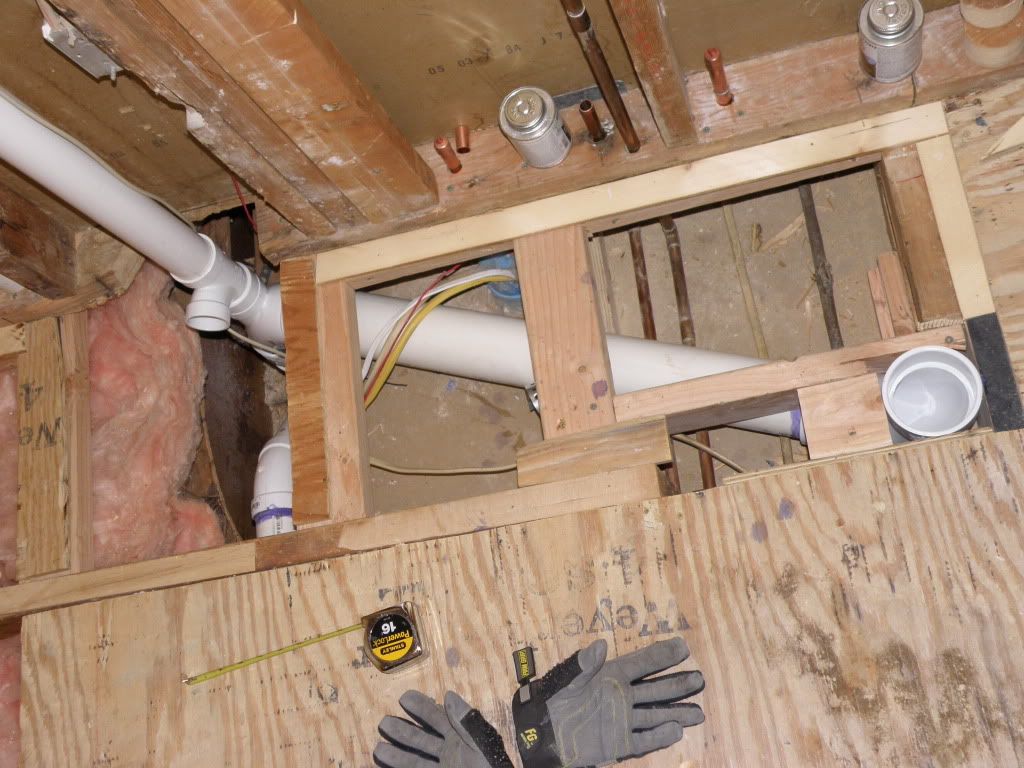
When the house was built one of the joists was shortened, with a short piece of 2x10 being placed across the end of it to tie it to the neighboring joists. (I'm sure "tie" isn't the correct word).

It's that piece of 2x10 that the toilet flange is butting up against. (I do intend to stick a piece of 2x10 in there to reinforce the board that had the holes in it and the holes I created foolishly. )

That joist that was shortened does have a wall sitting on it. Moving the wall and opening up the bathroom by another 16 inches would be nice, except there is a window on the other side. And I'm sure my girlfriend would not want that wall moved.

I should have given this more thought when I fell thru the floor/ceiling and would have been able to maybe move that cross piece over a bit more. But I don't think that would really provide enough support for that wall, especially as one of the base plate 2x4's is cut just beyond that cross piece.

I think maybe getting one of those real narrow toilets is the only option if it is too close to the tub.

Okay... just took some more measurements and it turns out that the centerline of the tub drain has actually been moved now to the right by 5 inches. So... never mind! :D
 
Last edited:
Hey there, plumbing peoples of the intenet....

Finishing up with some odds and ends and am getting ready to start putting down the fricking sheating.... finally.

I actually put a level on the 3" PVC from the toilet to the main stack and discovered the slope was a bit severe. So I have adjusted the height of the 3" sanitary tee and now have just a hair less than 1/2 inch for 2 feet (it's a 2 ft level. The entire drain to the 90deg elbow where flange will attach is about 26 inches.

I've lots of contrary views on how if it is too steep or too shallow solids won't move along properly.
 
The 1/2" for 2 feet will be fine.

However, the combination wye and 1/8th bend in the upper right corner of your picture NEEDS to be replaced with a sanitary tee. As it is, the trap will be cut off from it's vent when the lavatory drains.
 
However, the combination wye and 1/8th bend in the upper right corner of your picture NEEDS to be replaced with a sanitary tee. As it is, the trap will be cut off from it's vent when the lavatory drains.

I'm confused as I don't quite understand why a sanitary tee is necessary instead of the wye.

:confused:
 
Looking good- The drains -
Replace the combo tee on sink drain with a santee for the same reason you change the one for the tub

Wow.
I see you already installed the wye on the stack. Good.
Remove the long sweep tee for the tub drain. That needs to be a santee.
Like the 3 X 2 you had in there before.

For the same reason you changed the one at the tub.
Let's say the water draining out takes up about 1/2 to 3/4 of the horizontal trap arm. The air from the vent can not break the siphon of the water flow because it is below the the bottom of the horiztal trap arm. I see if I can find a better example to explain it.

found this

Santee vs combo.jpg
 
Last edited:
Okay.. I understand that. I think the problem is that the picture Phishfood was referring to is an old one. I already replaced that combo.. with a sanitary tee. I didn't realize that and thought he was referring to the wye with the cleanout plug on the far right since he did mention wye.

I didn't know that a "wye with 1/8 bend" is similar to a combo.

But thanks for taking the time to find (or make?) those pictures. They are really very good at depicting the situation.
 
Last edited:
your configuration is fine, mr david was pointing out that bigger is not always better but the 2" OR 1 1/2 will work fine. your tub will vent through the top of the fitting ( stack vented ) and your Toilet will wet vent through your lav, and as it must be the toilet is the lowest fixture in this vertical configuration. As far as having cleanout plugs or union ( screw together ) traps, you should NOT use them, they are only to be installed in easilly accesibble locations. here's a tip for the gluing for a first timer, Dry fit Everything and make sure all your measurements are correct before priming or gluing. also make the bottom of the p trap your last glued piece as you can make sure that the FOP. ( pipe coming out of the fixture ) and the trap arm ( pipe downstream of the p trap ) are the same length.
 
think I was many pages out of the loop. srry

You're not the 1st one to do that.

I didn't know that a "wye with 1/8 bend" is similar to a combo.

.

That's why they call it a combonation fitting.

Did you get all glued.

Was it mention earlier to glue the WC flange after the floor sheathing is laid so you can screw the flange to the floor.

Also you will want to block and strap the WC waste arm securely so you can't push it down or pull it up
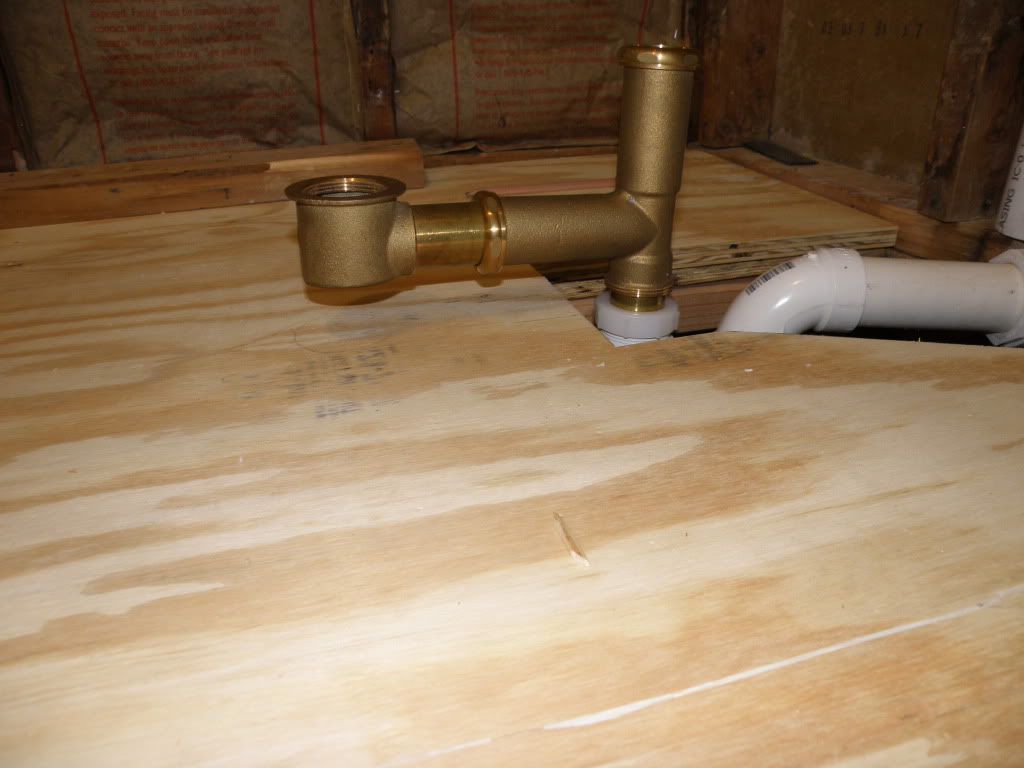
 
P7150010.jpg


The inlet of the bathtub P-trap will normally be set flush to the wall with the valve and centered with the drain of the tub.
There for the 3 x 2 santee will have to be rotated accordingly

Here's another pic I found.
This one is even cooler than the one where I sliced the WC down the middle.

FH02FEB_BATHDR_01.jpg
 
Last edited:
Did you get all glued.

Was it mention earlier to glue the WC flange after the floor sheathing is laid so you can screw the flange to the floor.

Also you will want to block and strap the WC waste arm securely so you can't push it down or pull it up

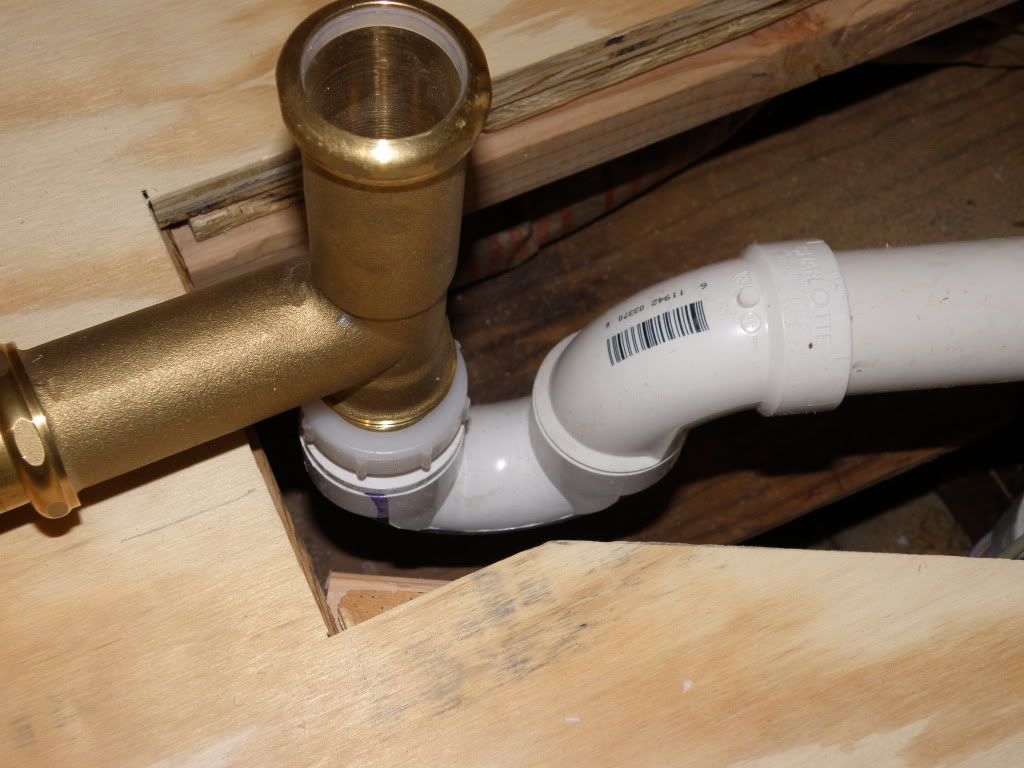
All glued except for WC flange and tub santee, etc...

Was also planning on adding more straps.

To fix those accidentally cut elect cables, I put one of them deep blue ceiling fan boxes in. My girlfriend was not thrilled when she saw hole in ceiling below. (I only explained to her what I was doing three times!).

So, since we want to install new smoke detectors, that are wired and interconnected, it will be installed there to cover up the box. I suppose having an elect box that close to drain and supply piping is some code violation. I was going to fill all the holes with silicone caulk.

"The inlet of the bathtub P-trap will normally be set flush to the wall with the valve and centered with the drain of the tub.
There for the 3 x 2 santee will have to be rotated accordingly"

Does this mean I can't a 90 degree turn between the brass tailpipe and p-trap? It doesn't have to go very far to the stack.
 
Okay... got another question.

I'm finally putting down the new subfloor and determining exactly how the drain for the tub will be configured. Because we want to try to center the tub along the wall, we are moving it a bit away from the wall where the stack is.

Also, to have the correct pitch on the 3" PVC from toilet, the sanitary tee on the top of the stack where the tub drains into is a bit higher than I would like.

You can see in this picture that the drain is about an inch higher than I would like.

PA310291.jpg


Yes, the drain is not level here but nothing is glued.

PA310290.jpg


In this shot looking down in the drain area there is lots of room below the trap.

My question is: Can I extend the "vertical dimensions" of the P-trap by adding some short pieces of 1.5" PVC so the trap is lower. I might try to find a longer tail pipe for the drain.
 
Hey Ajay how's things? How's the finger?

Haven't been hanging out here at PF much lately. I've been distracted else were.


You don't want to extend the dimension of the p-trap down. If you increase the depth of the trap it does not clean it self out properly and may not function as well as it should.

You probably have it all glued up, but I see you changed the 3 x 2 low heel outlet from the toilet with a 3" santee. The 3x2 with a street 2 x 1 1/2" santee in the top would have lowered the trap to were you need it.

I'll see if I can find a picture to explain. These are what I found


Other wise you will have to raise the base of the tub.

imagesCAZ43BBD.jpg

plumbing 002.jpg

low heel outlet.jpg
 
Last edited:
The darn finger is healed but is still sensitive to heat and too much pressure. Thanks for asking.

It became obvious to me that extending trap down was a bad idea. But it isn't all glued yet though the santee for toilet is. ever, as my girlfriend wants the tub in the middle of the wall ("it's supposed to be a luxury tub".. okay... what ever!!) I'm not sure what I"ll gain. I just want to raise as little as possible.

As its a "deep soak" tub its gonna to be hard to climb into if its too high. And we won't be able to add a high dive!
 
if its only an inch you are looking to gain then Set the tub flange on a 2x4 and you will gain 1 1/2 inches for minimal effort, you will need to cover the face ( exposed side ) of the 2x4 with something like the tub surface, I have seen tub surround used for this perpose, but tile looks better and lasts longer.

Sorry For being out of the loop, I am now a full time service plumber ( got sooooo tired of commercial bs ) and am buisy as hell, and also loving it. every day is different .

Congrats on the new service plummer deal. Less BS is certainly better BS.

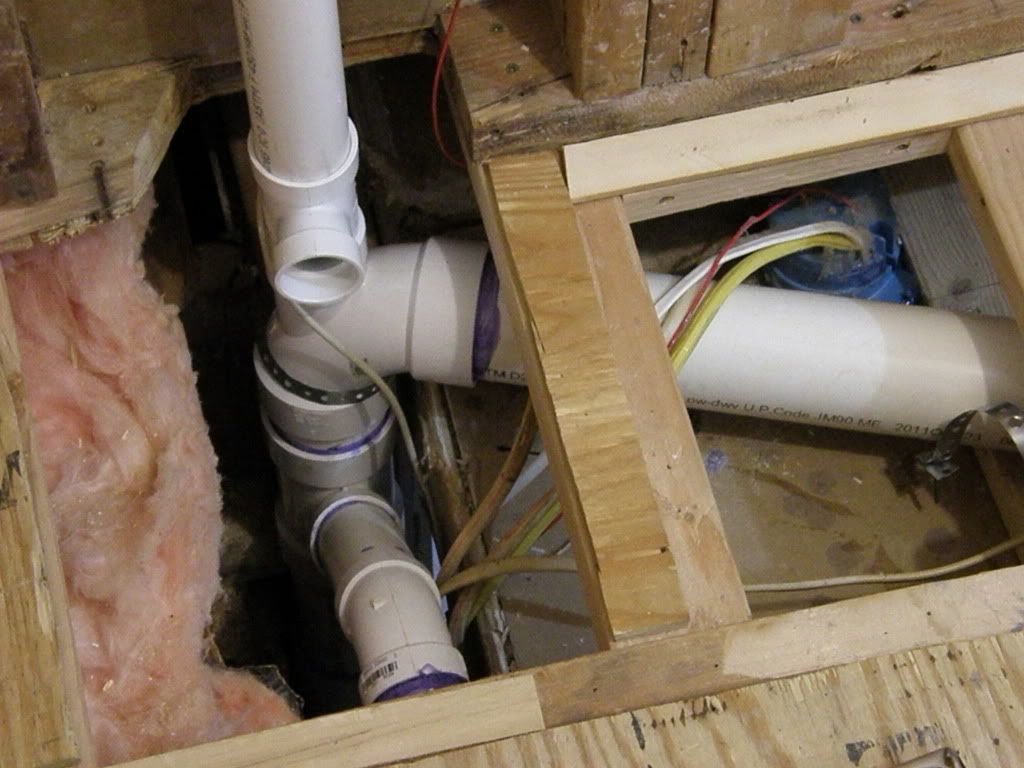
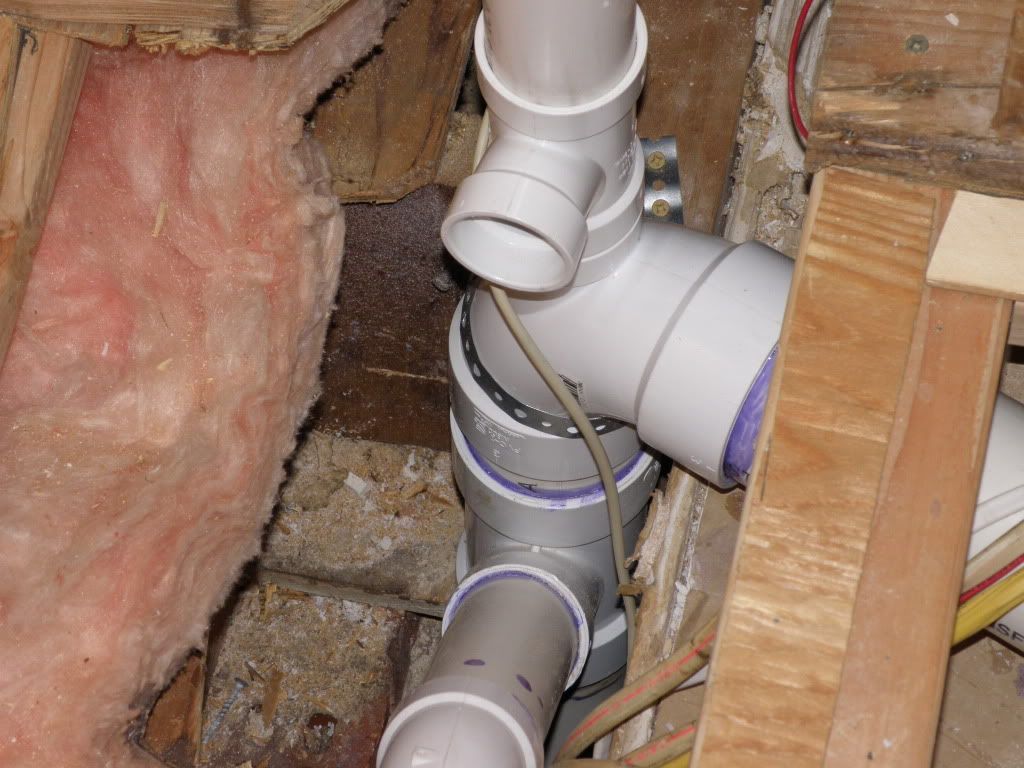
I ended up swapping out some of the drain parts so I could lower the tub a bit. On top of the subfloor I was going to put at least one, maybe two, layers of 3/4 ply to stiffen it up so that will raise is a bit.

Liquid... This tub can't be supported by the flange as it isn't cast iron. But I can just raise the base it sits on. But as it's a deep soak tub I was trying to avoid steps if possible.

Anyway.. here's what it looks like now..

PB120183.jpg


PB120185.jpg


PB120184.jpg


Also redid the toilet closet bend part and now that I have a laser level was able to take a lot more care in getting the correct pitch for that two inch section of 3" pvc.

However... I'm not just what the perfect angle is. Right now it is 3/16 for an 18" section. I hope that is good as I got it all blocked up/down, etc... so it won't move.
 
1/4 inch per foot is minimum grade and is where you ideally want to be, on a torpedo level the bubble will be just a smidgen past the line.

that looks better ^ tub p traps are usually plumbed in below the floor the tub sits on.

i assume you are using a clear glue with purple primer? i ask this simply because i've seen people not glue this type of pipe thinking that the primer was the whole sha-bang.... it looks as though your stack vent is not glued . ( top of the 3x2 t wye )
you do finer work than some of the licenced plumbers work i've seen.. good on :)
 
Back
Top