Toilet flange floating in mid air please help

Plumbing Forums

Help Support Plumbing Forums:

This site may earn a commission from merchant affiliate links, including eBay, Amazon, and others.

Johnq

Member
Joined
Oct 11, 2020
Messages
6
Reaction score
1
Location
USA
I bought a ‘renovated’ house that was never quite finished. And all of the renovations were done by obviously less-than-skilled labourers (I work in construction but mainly hvac).
anyways, here I am 3 years later and one of our toilets has started shifting and wobbling. It moved to the point where you can see a void underneath. you can see where whatever caulking they used finally went bad. So I crawled under my house to see what was going on. Apparently, when the remodeled that bathroom, they cut a 5 or 6 inch hole through the sub flooring and then hammered out a same sized ‘hole’ in the tile, ran the 3 inch drain pipe up, stuck the flange on the pipe, then stuck the toilet on the flange. So the flange is just floating in thin air on the pipe and the toilet is just sitting on the tile. Is there a way to get something in there that I can bolt to without taking up the tile and replacing part of the subfloor? Thank you all
 
You need to pull the toilet and post pictures of the floor and flange.
Then post several pics of the framing below it.
 
Normally a toilet flange on pvc would need to be screwed into the subfloor for stability.
 
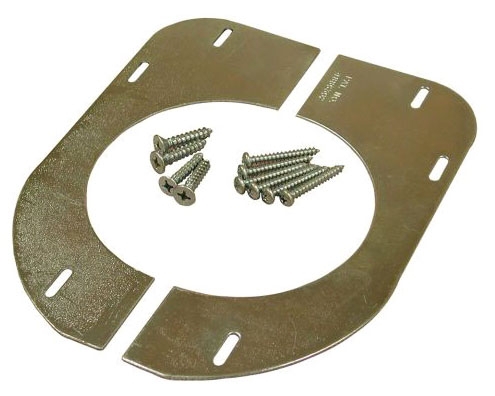
You could maybe use something like this.
Steel, Flange Support for 3, 4 or 3 x 4 Plastic Wood Floor Closet
 
I am now in WV. Loving it and living on the river.
 
I am now in WV. Loving it and living on the river.
Nice. I’m from purcellville, lived in shepherdstown for 3 or so years, Morgantown for 2 years, I’m in NC now in the swamp ha ha
 
Should you need to cut holes in tile, diamond hole saws are the go to tool. Not too expensive. Make a puttty or caulk dam around the area to hold water to keep the tool cool.
 
Should you need to cut holes in tile, diamond hole saws are the go to tool. Not too expensive. Make a puttty or caulk dam around the area to hold water to keep the tool cool.

For cutting LARGE holes in tile, absolutely use a wet diamond hole saw; for the casual user you can get sets on Amazon very cheap, like this:

Diamond Drill Bits, Baban 10Pcs Hole Saw Diamond Drill Bit Hollow Core Drill Bit Set for Diamond Coating, Carbon Steel for Glass, Ceramics, Porcelain, Ceramic Tile, Marble, 6-32mm
https://www.amazon.com/dp/B01L92YM1A/ref=cm_sw_em_r_mt_dp_xaBIFbMQ2HSG7

When I use these for larger holes, I cut through a piece of ½" plywood to create a guide. Once the hole is started I work slowly, stopping to wet the bit or pour some water on the area. No dam needed.

I just finished a bathroom renovation, and I needed to drill more than a dozen holes in tile for screws to mount shower frames, toilet flange, grab bars, etc. My go to drill, a Bosch 18V cordless, had stopped working (broken gears) before hand, so I was forced to use my [$10] Drillmaster CORDED drill from Harbor Freight...and am very glad I did. With this corded drill, you can get the bit to turn much much slower than a cordless; allows you to press hard with the masonry bit, get it going very slow, with no "walking". Once you hear that tiny "crack" sound of the bit's tip penetrating the glaze of the tile, you can speed up the drill. This went so well, so smoothly I'll never use a cordless on tile again.
 
You need to pull the toilet and post pictures of the floor and flange.
Then post several pics of the framing below it.

flange is floating, not even flush with tile, and bolted to nothing
 

Attachments

  • EF2E9DCA-FAB0-481B-8759-4E64256FFB68.jpeg
    EF2E9DCA-FAB0-481B-8759-4E64256FFB68.jpeg
    1.6 MB · Views: 10
  • F935BC73-752B-4233-9CA0-86A376CC5D4F.jpeg
    F935BC73-752B-4233-9CA0-86A376CC5D4F.jpeg
    1.6 MB · Views: 11
  • 007E9243-E485-4FBC-98E2-FFFD7897355E.jpeg
    007E9243-E485-4FBC-98E2-FFFD7897355E.jpeg
    1.9 MB · Views: 9
flange is floating, not even flush with tile, and bolted to nothing
And where you can see that rusted floor register it’s just about center of the floor joists which run parallel to it
 
Job finished thanks everyone for their help. I put 2x4s in then filler wood so I could screw the flange to something then replaced all of the hardware back up to the tank
 

Attachments

  • 644C7360-E610-4A5E-8282-DB12A09787E1.jpeg
    644C7360-E610-4A5E-8282-DB12A09787E1.jpeg
    1.6 MB · Views: 5
Back
Top