My bathroom repair project

Plumbing Forums

Help Support Plumbing Forums:

This site may earn a commission from merchant affiliate links, including eBay, Amazon, and others.

Zanne

Well-Known Member
Joined
Mar 23, 2013
Messages
3,161
Reaction score
698
Location
,
Since I like to do long posts, I will give a bit of history on this house:
Apparently this place used to be a peanut farm and there was a house over 60 years ago that burned down and a new one was built in its place. I believe the oldest portions of this house were built in the 30s or 40s and some additions were added in the 60s or 70s. We bought the place in the mid 80s.

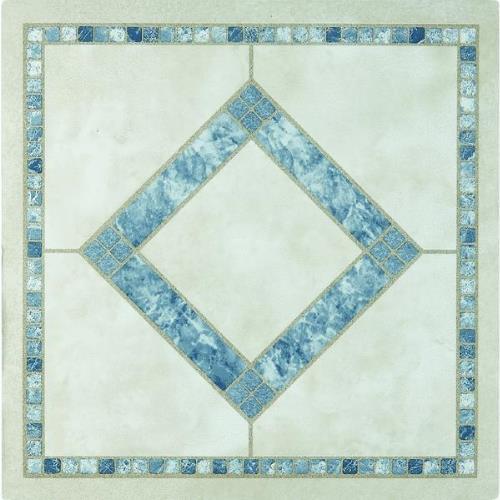
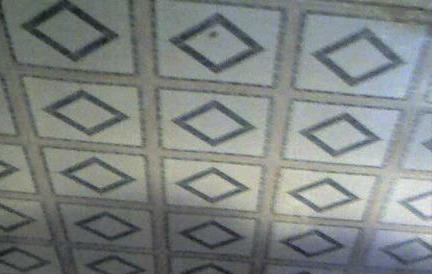
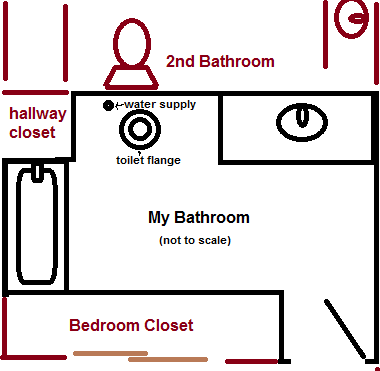
There are three bathrooms in the home-- one of which had avocado green tub, sink, and toilet. My bathroom fortunately had white fixtures and has a blue and white theme. The wall panels are fairly thin plywood printed with a blue and white striped texture.

The nicest thing in the bathroom is my cast iron tub.

Unfortunately, for some reason the people saw fit to put carpet in the bathrooms (probably because they did not actually use any insulation in the house and it likely got very cold in winter).

My shower/tub originally had a panel with a mural of ducks and a pond or something that looked pretty nice. In 1992 we transferred overseas for what we thought would be a short stint but ended up being stuck overseas for nine years while the tenants from hell mucked about in our house.

When we returned we had the carpet removed and had cheap linoleum installed. There appeared to be some damage to the floor and we didn't realize there was no subfloor in the one bathroom. The flooring guy poured some white powder and put water on it to try to repair some of the damage.

After the floor in the adjacent bathroom broke, dumping the avocado toilet on its side (with my brother on it), my toilet started leaking under the linoleum-- I could feel the water under the linoleum.

I pulled it up and discovered that the toilet had been installed over the carpet and that the carpet had been soaked (I guess the wax ring died/leaked) and it soaked the floor. Fortunately I had a moisture barrier and subfloor, but the top layer was ruined. It seemed to be only one plywood board (which happened to go under the wall).

I wish I'd had a picture of my old toilet. I actually liked the look of it, but it did not flush efficiently.

Here is what I saw when I removed the toilet.
5974_122921715167_3354131_n.jpg


I peeled back the linoleum which was sticking to the floor (it was not ever glued down but the water made it stick)
5974_122921730167_3815513_n.jpg


I removed the piece of carpet which left the carpet pad underneath
5974_122921750167_1468672_n.jpg


I removed that and you can't tell from the picture, but the wood underneath was the consistency of mud
5974_122921755167_2371517_n.jpg


I scooped out the mud-like disgusting wood and started clearing it away from the flange
5974_122921765167_7284919_n.jpg


It took me a long time but I finally managed to chisel the board where it went under the walls and remove it.
5974_122935530167_6509751_n.jpg

5974_122935540167_7123164_n.jpg


Now, I am no carpenter and I had never embarked on a project like this by myself before. My father always helped me with my projects, but he passed away suddenly during this project, so I was on my own. (Before I actually chiseled the old floor out, we didn't know about the little plugs you could put in the toilet flange to keep out sewer gases and other crud and the plumbing backed up and flooded the bathroom multiple times-- making the floor really disgusting. I subsequently learned about the plug and put one in). The type of boards used in the original floor are no longer available as far as I can tell so I used 1/4" luan (not sure on the spelling) per the recommendation of a friend.

Here is the new board next to chunks of the old
5974_122933390167_7295628_n.jpg


My bathroom was quite cluttered
5974_122933400167_1632800_n.jpg

5974_122933410167_70704_n.jpg

5974_122933405167_2089232_n.jpg
 
I decided to make a template using an old packing box. I bought some cheap lipstick (I don't wear makeup and don't even own any) and put it on the toilet flange to get an impression for the hole. I cut the cardboard to fit in the space of the missing board and included the holes for the water supply and toilet flange.
5974_122935545167_7833366_n.jpg


It fit rather nicely
5974_122937555167_4269186_n.jpg


I taped the template to the board and marked the outlines
5974_127378610167_4135746_n.jpg


I had a bit of trouble drilling the holes to get started with the handheld jig saw so I could cut out the holes for the flange and water supply. The cheapass drill bits from Harbor Freight kept bending and wouldn't go through. I thought I was doing something wrong until I found one of my father's old toolkits with a ton of old good quality drill bits. They went through like a hot knife through butter.
One of my dogs photobombed while trying to figure out how she could get food out of this situation.
5974_127378615167_3102047_n.jpg


The wood tended to splinter a little. I probably should have used a handheld circular saw but I don't have the arm/hand strength to wield one with only one hand and I had no assistance so I had to hold the board down with one hand. I have since purchased some clamps and such.
5974_127378630167_5924662_n.jpg


I did cut the hole slightly larger so that I had more wiggle room around the flange. It fit rather nicely.
5974_127378635167_5990133_n.jpg

5974_127378645167_3105130_n.jpg


I used decking screws to secure it (not sure if that was a good idea or not) and puttied over the top of them. The only problem was that the new board was just slightly thinner than the old wood so there is a ridge.

My plan is to use self-leveling flooring mix to level it out. I just need to raise the toilet flange a little and shim it (I actually had shimmed it and lifted it as far up as it would go (it is nailed down), but it is not level. I am thinking of pulling the nails up and leveling the flange.

Does it matter if it is level or will the wax ring compensate for that?

I just need to find the right materials to plug the holes to keep the leveling compound from flowing into them. I think someone somewhere suggested some type of foam and tape or something.

Since that work was done, my cats have made a mess of the bathroom since the litterpan is in there and some of the cats like to go outside of the litterbox. One cat in particular shat over the hole for the water supply. I went on a trip for a couple of weeks and my brother was supposed to change the litterbox and such, but he didn't so the cats went crazy in there.

This is a recent picture. I was trying to show the wood piece under the tub that holds it up-- the wood sticks out a bit from the tub so I can't put anything flush against it without having to notch it. I'm not sure what I should put along the edge of the tub to disguise that bump. I am pondering wrapping the linoleum up over the wood and trying to jam it into crevices.
1234799_10151580409165168_789590981_n.jpg


Please excuse the crud on the side of the tub, I couldn't actually see it with the lighting in the bathroom, but the flash makes things more evident (there are no working lights in the bathroom)
1184969_10151580409040168_1517089432_n.jpg


Along the side of the tub there used to be a strip of rough wood that used to give me splinters. I pulled it off and am trying to figure out what to use for replacement. I was thinking about using cove molding. (That reddish tint on things is from the iron sediment in the well water. The hot water comes out a reddish brown color sometimes).
1174598_10151580411255168_111112215_n.jpg


My father installed the corner shelf things and the tenants ruined the old surround that had a mural and put flimsy crap over the panels.
1006336_10151580411345168_1123947407_n.jpg

1236880_10151580413570168_1252622198_n.jpg

1173710_10151580413425168_1668250112_n.jpg


The tenants also managed to scrap a chunk off of my tub
1238010_10151580413165168_249942862_n.jpg


I need to figure out how to fix that.

I plan to wrap the linoleum up the walls an inch or two before putting some kind of molding on the walls. Some of the panels don't reach the floor so I need to cover those gaps.

I have some cove molding that can cover the vertical gaps.

I am going to install a Toto Drake ADA toilet with SanaGloss. I'll put on a Zofa padded softclose seat. It has quick release hinges so I can take it off and clean it easily.

I'm thinking that it will be easier to put the linoleum down first and then put the toilet down over it and caulk around the toilet to seal it.

I'm going to see if the old cardboard template is in good enough condition to help with creating a template for the linoleum since the room has a lot of cutouts.

I want to create some sort of storage solution above the toilet but the ones in stores are particle board and more expensive than they are worth-- plus they block access to the toilet tank.

My original plan was to fix up the vanity and replace the top and sink, but I can't find any sinks that are as deep and the new vanity tops are more expensive so I will probably just try to clean up my existing sink and try to spruce up the counter space a bit more. I'm replacing the mirror and plan to add some shelving. I'm replacing the hardware on the vanity drawers and doors as well.

I really don't like the ceiling tiles (they don't look this clean and some of them are broken)
1175705_10151580442580168_1933551748_n.jpg


I found some self-adhering 12"x12" vinyl floor tiles that I want to put up. I was thinking of using some 3M spray adhesive to help, but I will probably have to fill in the holes with something so they won't show through the tiles. I know moisture might be an issue and people have worried that they might fall. I do have a dehumidifier though. I'll have to dig up the picture of the floor tiles later. A friend installed them in his kitchen over his existing tiles and they looked pretty nice (except for the part where they weren't all form the same dye lot and there was a color variation).

I really need to get off my ass and start working on this. I have cleaned up the floor quite a bit but I need to prep it for the self leveling flooring. I don't plan to do the whole bathroom so it is only a small area. I need to figure out how much to mix up and hope that the sediment in the water won't mess it up.
 
This is the floor tile I want to put down. I got a few packs of 30 for about $7 per pack from Dollar General.
tumblr_msqvdqxl5O1qhfuqwo1_500.jpg


I took a picture of the kitchen floor my friend did with these tiles and flipped it vertically to see what it would look like as a ceiling (I will endeavor to get a better picture-- my old phone had a crappy camera).
tumblr_msqvhkFxFu1qhfuqwo1_500.png


I got this drawer/door pull
tumblr_msqxb8y0HA1qhfuqwo1_400.jpg


And a pack Allison AL-265 chrome and white cabinet knobs (apparently its also called Amerock but is from the Allison Value collection) for a set of drawers. Unfortunately there is no escutcheon at the base and the previous knobs were painted while on so when I took them off, the paint peeled so there is a visible area of missing paint. I either need to repaint or I need to find something I can put on to cover it up.
tumblr_msqzndySqg1qhfuqwo1_400.jpg
 
Yeah, that's if I even get them up. LOL.
I, too, am skeptical about how long they will last, but they are just sitting in boxes and its not like I have any other use for them for now. If I have anything left over maybe I can make a backsplash somewhere-- but I doubt I will have extras.

I'll have to get a ladder in there and hope that I get things going on straight. I'm trying to figure out what the best starting point will be for putting them up. Did I mention that I am absolutely terrible with stickers and anything adhesive? I always get things crooked. LOL. So it will be extra fun. I'll feel better if I at least give it a try.

IIRC, a little heat can loosen the glue up so I need to find a low-powered hair dryer. I know we used to have one and my father used it on some strips of laminate edging years ago (which is probably the only time in like 15 years that anyone in my household used a blow dryer).

The floor and toilet install will have to take priority. I might just put a few up first and see if they stay and then add more if they last more than a week or two.

I'm debating whether or not I should sand the floor before pouring the self-leveling stuff and I am trying to figure out how much prep work I should actually do and if I should buy anything extra to put on the floor. The powdered white stuff that my floor guy used to patch stuff didn't really last in other rooms. It broke apart. We were actually thinking of hiring him to do the flooring but he retired from that line of work after his knee surgery. He drives a school bus now. He may be able to give me some tips though.

I will probably not be using adhesive for the floor. It may be a bad idea to forgo that, but with my luck I would get it hopelessly stuck in the wrong spot-- or somewhat recreate a scene from an article written by Dave Barry about a woman who got herself glued to the floor while trying to install her own flooring. :D

I'll have to scout around my yard to find a flat area with no obstructions so I can unroll the linoleum somewhere and at least get some rough idea of where I need to cut. I can maybe mark the back of things. I need to look at my guide of what measurement each line on the measuring tape means for some of the smaller increments. I know 1/4 and 1/2 and such but I keep forgetting and different measuring tapes sometimes have different increments. I'm guessing 1/8 is one of them on there. I must sound like such a noob. LOL.

I'm so rusty on this stuff and I'm sure if I just build some confidence and actually think about it I can figure it out.

Speaking of which, I'm going to have to temporarily lock my cats out of that bathroom when I start working on it.

I'm debating whether or not I should run the dehumidifier when the leveling stuff is drying. I've heard it can dry pretty fast though. I need to figure out how to open my vent/light/heat thingy so I can change the bulb and try to figure out why the vent part doesn't work (I highly suspect it is not actually tied in to the rest of the venting and just goes to the attic).

I should probably outline a plan or something. Or maybe I'm just thinking about it too much and need to start doing instead of thinking. LOL. I believe I had my linoleum cut at least a foot longer than it needed to be so I would have room for error.

I'm seriously pondering figuring out the lowest point on the room and installing a floor drain, but I don't know how much work that would be and what I would need to do to ensure that it is to code. I doubt I could have it just dump straight under the house.

Would it be a bad idea to paint the floor with Killz before putting the linoleum down?

Also, is there anything I can put down under the linoleum that will sort of buffer any floor imperfections/bumps/ etc that won't cause the linoleum to dent in when stuff is placed on it?

Thank you to everyone who read this and I appreciate any future comments-- even if it is just to motivate me. I always need motivation and am not getting much from my family right now.
 
For the linoleum, use a template made of thick paper and cut it out exactly as your room dictates. Then go to a flat surface and cut the linoleum. Place it in the room, fold it in half, glue this side and lay it. Then fold up the other side, glue it, then set that side down.

For a perfectly straight line, use the 3-4-5 foot measurements. If one wall is 3', measure down the other wall at 4', and the dissecting line across the two walls will measure 5' exactly for a straight line. This will allow you to run a chalk like across the ceiling for an exact straight line.

I would not Kilz the floor, it will hurt the adhesion. Just keep in mind, linoleum is very thin, and what is under will be transposed above it. You would be better off to line the floor with a luan type of plywood on the floor prior to the linoleum. It will allow some uneven surfaces below it, and will not print the finished floor.
 
Thanks. My brain isn't getting the 3-4-5 measurements thing for some reason. I'm not familiar with it.

I don't know if I can find a flat surface large enough for the linoleum. I think the sheet is 12' by 10' or something like that. It came in 12' width off the roll so I will quite a bit of excess to trim off.

Btw, here is a rough sketch to show the layout of my bathroom. It is not to scale though.
tumblr_mntoi1zgYS1qkwd9ao1_400.png


If I put another layer of luan on the floor over the existing floor, you think it might help? I suppose I would have to nail it down or screw it down.. Can't just leave it floating.

The fun will be getting it home-- unless the place is willing to deliver. Last time I bought two sheets of luan they tied it to the top of the Expedition for me and it snapped and broke from the wind and chunks flew off so I had to stop and get out to retrieve it. It was small enough to fit into the Expedition after that though. Fortunately the person in the vehicle behind me was keeping a safe distance and the scraps missed their car.

The linoleum I got is actually thicker than standard linoleum. It has a bit of a cushion to it, but not much. Someone elsewhere suggested that I could put a layer of felt over the floor instead of having to put down more wood. I don't know how well that would work.

I will probably do a dry fit of the linoleum before messing with any adhesive. I'm still debating whether or not to actually use adhesive. I would likely have to scrape the floor to get rid of the remains of the old linoleum. The underside of it peeled off and stayed-- sort of like when paper gets wet and sticks. I'll have to try to remember what brand linoleum it is so I can get the right stuff.

The more I think about it, I think I should try to fix the vent/lite thing or at least replace the light bulb before I put in the new flooring. That way I don't have to worry about scuffing it with the ladder. I still need to get it open. My HVAC guy said he thinks it is a Broan. Its been in the house for at least 25 years-- probably more than 30.
It looks like this one.
tumblr_mp5ggwNfYc1qkwd9ao1_500.jpg


The vanity has a bit of a toekick so the linoleum can go up it and over the board I managed to attach to the front on the bottom. There is still carpet under the vanity and when the bathroom flooded with sewage it went under the vanity so that carpet is absolutely disgusting. I tried to pull it out but had no luck so I decided the next best thing would be to seal that off so nothing could get under there and none of the grossness that was under there could escape (mold, bacteria or whatever).

I had a longer post typed up but I forgot to hit "Submit Reply".
 
Last edited:
One of the challenges when creating corners is getting them square. While no room is ever PERFECTLY square, we need to get the corners as close to 90 degrees as possible. If not, any tile or carpet laid will be noticeably 'off' from one side of the room to the other. Using the 3-4-5 method for squaring corners will help ensure your corners are square. Use this approach when framing walls to make sure that your corners are square.

Here is the site for you to look at:

http://www.wikihow.com/Use-the-3-4-5-Rule-to-Build-Square-Corners

Regarding the luan, I don't know what your existing floor looks like to tell you if luan would help or not. If you use luan, I'd screw and glue it down prior to installing the linoleum.

And yes, I would first replace your fart fan/light before laying the floor, just in case you drop something during installation.
 
Oh! It uses "the square of the hypotenuse is equal to the sums of the squares of the other two sides" rule. I do know that one. I just wasn't visualizing what you were describing because I didn't realize you you meant to measure from the corner and then measure the hypotenuse. (And I didn't even have to use spellcheck for that! Woohoo)

I always remember that rule because I know a joke about a mathematician going to an Indian reservation and the punchline is "The squaw of the hippopotamus is equal to the sons of the squaws of the other two hides".

I will upload pictures later to show the floor and the actual vent/light/fan. I'm having a hard time finding lights that have all three of those functions for some reason. At least I know I have the wiring for it already to the socket, although in one of the ventilights the heat and vent are mixed up (tenants mucked with it).

Other than the new piece I put in to replace the damaged board, all of the pieces seem to be flush with one another.

Oh, and the flooring guy actually called me today but the phone cut out before I could ask him about linoleum installations and such. (He was calling to let me know that someone spotted my cows out in the hunting club area-- I went out and my cows were in the barnyard so either they were the wrong cows or mine came back).

I'm going to see if I can get get enough light to check those measurements. There really are only two corners in the room that I can check because obstacles block the others.

Edit, I'm going to have to get better lighting and move stuff out of the way to get the measurements. The condition of the wall panels at the bottom wasn't helping.

Edit2: Photos.
This shows how they tried to cover mistakes/gaps with strips of wood near the ceiling and up the walls.
1235426_10151584273325168_204731621_n.jpg


This is the actual vent/light/heater-- it kept going crooked and I couldn't get it to stay straight.
1236582_10151584291745168_793490559_n.jpg


This is the floor more toward the vanity. You can see the color difference between old and new.
1174934_10151584291755168_1205867408_n.jpg


This is a closeup where you can see the ridge between the new board and the old ones.
1230047_10151584294585168_576196096_n.jpg


This is a shot that shows the residue of the old linoleum still stuck to the floor
1234173_10151584294595168_1109857666_n.jpg
 
Last edited:
I tried cleaning the floor some more but my cats decided to get in the way. I have a large dust pan and one of the cats decided to "help" by climbing inside it when I was trying to sweep stuff into it.
I cleaned up the tub a little bit.
954794_10151606568225168_849726107_n.jpg


I also started taking note of some of the accessories I picked up to make it look nice (something that I hope will motivate me).

So I have this cup dispenser
1239907_373011872831684_74140054_n.jpg


This soap dispenser/misc object container holding spare change for the time being
1236639_373026576163547_1377427507_n.jpg


This AquaSource 1/4 washerless cartridge gooseneck sivel faucet with porcelain lever handles.
537941_372985472834324_741517892_n.jpg


Later I might find pics of the shower rod and stuff like that. I have a chrome and white theme going on. I don't know why I like it so much, but I do.

I've been busy cleaning up after the cats and cleaning the kitchen and such so I haven't worked too much on the bathroom. I really need to though.
 
So, I meant to get started on this sooner but I got sidetracked and procrastinated. I finally got someone to help me but my mix sat for too long and was no good. It clumped horribly and it smelled pretty strong. My friend said it smelled like hair dye. I've never dyed my hair so I wouldn't know. He couldn't handle the smell so after reaching some spots I had trouble getting and smoothing as much as he could, he went outside to get some air. He said I was in there another 20 min after he left.

Not all of the stuff came out of the bucket and the one time I noticed the smell was when I put the trowel in to try to pull it out. It was like ammonia and made me choke a little. Other than that, I didn't notice.

Now, I've never used a trowel before and never used this sort of mix. I learned that I suck at it.

The mix (even mixed as directed-- using one of those mixers attached to a drill) did not even flow at all. It was like peanutbutter and I had to spread it.

I had to take my friend home early because his wife kept nagging him and then she wanted lifts to places and it took me a lot longer to get back home than I'd thought. It was too dark for me to really see well so I didn't know what else to do. I could see that it wasn't exactly smooth, but I didn't realize just how lumpy it was in the dim light.

I did try to salvage somewhat by making sure to trowel some of the stuff up against the ridge where the different floors met so there wouldn't be a visible seam.

The floor felt horrible the next morning.
1514565_10151807161285168_259615183_n.jpg

1530542_10151807161585168_109954572_n.jpg


It stuck to the cardboard and the cardboard tore off when I tried to remove it. I had to try to chisel it out but that stuff is hard as rock. I tried sanding by hand but it did nothing. I tried an attachment to my black&decker matrix but the matrix kept shutting off (the battery is currently charging). I got a belt sander with dust/catching attachment and went at it for awhile. It took the sharp points off of things, but didn't do jack to even them out. The sandpaper eventually tore.

I called several hardware stores to find out if anyone had quick drying leveling stuff. My favorite local place only had a 50lb bag and said it did not set fast. The other local place had a rude clerk who was angry that I asked questions and hung up on me. Home Depot did not have any premixed stuff and I wasn't sure if I wanted to drive an hour to get the stuff. Lowes has the phone menu from hell and I got redirected and put on hold for 6 min before being hung up on. I called back and spent another 5 min in the loop before I had the operator look up something specific. I decided it was not worth it to go up there bc the stuff they did have was premixed but did not level itself.

I finally decided to just make do with what I had and put the underlayment down to see how bad it was.
1526195_10151807164125168_1020141903_n.jpg

946726_10151807163405168_162843534_n.jpg

1511231_10151807169845168_1224555485_n.jpg

548487_10151807169965168_2044378472_n.jpg

1504070_10151807170090168_393275036_n.jpg


The adhesive on the clear strips sucked so I used packing tape over the top to hold the seams together.

I also put a coat of killz primer on part of the wall that was all scratched up.
1477495_10151807166895168_2015307708_n.jpg


I know the underlayment isn't exactly flat. I couldn't get it to go flat for the life of me so I just accepted that its not perfect and moved on.

I'm going to move everything off the floor and use the underlayment as a template for the linoleum. I just have to be very careful to not tear it or mess up the seams.

I'm seriously considering putting down a double layer of underlayment in the area with the leveling mixture to make it feel less bumpy.

Anyone know if that is a good idea or bad?
 
After seeing the pics, I think if you have room you can probably fix it by adding a little more mud that is mixed wet to where it will level itself. It may work?
 
Now that I've read this entire thread, am I correct in saying you were using the SLC just to raise the unevenness from the new to the old sub-floor? If so, I would recommend pulling that entire piece of plywood, which has the SLC stuck on it. Then replace it using a real thin veneer at first, then the plywood, so it will all be the same thickness. SLC is primarily used when you have dips or "birdbaths" in the center of the floor. Yours looks straight as an arrow.
 
I wasn't using it just for that ridge. The floor is uneven from side to side and it had quite an incline.

I know its shoddy work and it probably isn't good for the long run, but I want to have it usable for my sister when she arrives and I don't have time to pour the self-leveling stuff again.

I can barely feel it with the linoleum down-- but if it starts to bother me too much I can go back and do the self-leveling again.

I'm a bit nauseous and dizzy right now so I'm taking a break. I'm going to work on some more painting after a nap.

I'm disappointed that it didn't turn out better (part of it from laziness I suppose), but considering this was my first attempt I'm glad I didn't cut myself with the box cutter or something.

After taping the underlayment together I cleared my bed and had my brother help me put the linoleum and underlayment on the mattress (hanging off the end quite a bit) so I could line up the underlayment as a template to get my first corner. It wasn't perfect, but it helped. I only made small cuts at first because I wanted to be sure it would fit.

The linoleum is 10'x12' so it was bulky and heavy. I put the underlayment back down and had some frustration with my cat reaching under the door and pulling on it and making it go askew.

After shouting obscenities at the cat and scaring her off, I dragged the linoleum into the room by myself. It wasn't easy bc it wasn't a straight path and there were some twists and turns. I had to call my brother in to help me get it moved in (since it took two people to get both ends to move properly.

Long story short, its not perfect and some parts don't want to lie flat, so I will have to make adjustments when I do the base molding.

1535621_10151807619280168_1980819911_n.jpg

1460285_10151807619610168_1398972653_n.jpg

1532152_10151807619780168_1867373797_n.jpg

1491720_10151807621780168_359811976_n.jpg

1477338_10151807621910168_1313166570_n.jpg

1503267_10151807622025168_437072897_n.jpg

1533875_10151807622315168_368496854_n.jpg


The vanity is going to get a fresh coat of paint before I'm done. I'm just too tied and feeling icky to do it just yet.
 
It is an improvement, no doubt. Just curious, why are you using the underlayment? I believe gluing it down would allow the floor to lay flat and last longer.
 
It is an improvement, no doubt. Just curious, why are you using the underlayment? I believe gluing it down would allow the floor to lay flat and last longer.

My house is poorly insulated and the floor is usually very cold so I wanted to have something to keep the floor just a tad bit warmer. I also wanted to make the floor a bit more forgiving of any bumps and imperfections.

And to be perfectly honest, I absolutely suck with anything adhesive. I'm a klutz and I always end up getting things crooked and getting glue all over myself. So part of it was being insecure about my ability to do it and partially laziness.

A tiny percentage of it is that I didn't really like that flooring but it was what my mother picked so I'm stuck with it (I really wanted one of the Congoleum Ultima rugs but there were no dealers that sold it in our area and the price was a bit too high). I wanted it to be somewhat easy to remove if there are problems.

Now, that said, I am probably going to try to get it as smooth as possible and then use packing tape to tape it in place in spots that will be under molding.

I just put a coat of primer on the cabinets and took off the old hardware (I do like the old hardware so I'm saving it in bags so it can be re-used or given to a friend or something). I used some of the scrap linoleum to cover up the floor as I painted so it wouldn't get any spills.

I was getting upset with myself because I couldn't find the escutcheon for the water supply line but I finally found it this morning. (If my limbs were not attached to my body, I would lose them). Now if I can find the bolt caps. I have no idea where they went. I thought I saw them and then I realized that those were just general caps for plumbing for when a line breaks and I no longer want to use it. I had to cap off so many outside lines a couple of winters ago. It doesn't normally snow here. It used to snow only once every 20 years. I remember it was a big deal when we got some snow when I was in middle school. Twenty years later it snowed again, but then it snowed the next year too.

I'm debating whether or not to do the final coat of paint before I go to the store to get pvc glue for the water supply line. I'm also debating whether or not to put the supply line in before I put the toilet in. I need to find the toilet bolts. I wonder if they sell them in shorter lengths. The ones that came with the toilet originally were too long to fit the caps. I suppose I can use bolt-cutters and trim them once I figure out how tall they need to be. Here's hoping they fit into the flange ok. I may have to take tweezers and clear out any debris.

I also hope I can find my toilet shims if I need them. I saw them the other day but now I don't remember where.

Thanks for the feedback and support, btw. It helps keep me motivated.

I'm hoping my sister will be surprised when she gets here and sees the bathroom-- if she can ignore the mess in the rest of the house. LOL.
 
Toilet bolts are designed long so you can thread them with the wax ring installed. As the wax crushes down, the nut goes down on the bolt more. Once the toilet is seated, get a hack saw blade and cut off the excess. They also make break away bolts, so with a little bend with pliers, the excess will break away, allowing you to place the cap on top of it.

Back to the vinyl sheeting you are using, that isn't really designed to be used as a free floating surface. I'm just concerned that your mom or brother will snag a loose piece of the vinyl and not only rip it, but could fall and hurt themselves. The glue for that floor is real simple. Lay out the vinyl exactly, then flip half of it up, so the bottom is on now on top. Using a paint roller, roll the glue on the underside of the vinyl, then flip back in place. Then move to the other side, flip it up, glue that side, then flip down. With the glue, you will get bubbles formed underneath it, so use your body and roll around the floor, using your hands to push the bubbles out. That's it...your done.

I would install the PVC before setting the toilet. It will give you more room up top. Don't forget the PVC primer when you get the glue!
 
Thanks for the info. When we bought the vinyl we were told that it was designed to float and wasn't supposed to be glued. That was one of the reasons we bought it.

My mother won't be using this bathroom. The large bump is gone now, after I applied some pressure and moved stuff around a bit. I'm going to at least tape the edges. I don't want to make anything permanent until I have a chance to get something to patch the botched self-leveling job.

I got break-away bolts with little plastic things that are supposed to hold them in place. Am I supposed to leave those on? I'm assuming I'm supposed to as they will hold the bolts upright so they won't move around as much as if they were just floating free. I didn't realize the break away bolts could be broken with pliers. I thought I would need bolt cutters.

Went to Home Depot and found an oak colored flooring on clearance and the salesman said it should go down in price by Sunday and to call and ask about the price. He put my name in the system as having inquired about the product so they will be able to look it up more easily. Its normally like $2.50 per sq ft but its currently down to $1.99 and will go lower. We just need to make sure we know how many boxes we need to cover the kitchen and hallway and then figure out how much baseboard and quarter round we'll need.

Then we have to find the right underlayment. They kept saying we need a moisture barrier and underlayment, but I thought the underlayment (at least some of it) had a moisture barrier. Nothing I read on the products said anything about needing the moisture barrier.

I got some painting done today and I'm going to put up the molding tonight. I was going to get more done but my mother had a doctor's appointment at 2:45. The doctor didn't see her until 3:35 and we didn't get out until after 4 and then we had to go pick my sister up at the airport. Just got home around midnight (we looked at Lowes and Home Depot and then I went into Bed, Bath, and Beyond to sit in the massage chairs for awhile.
 
After weighing my options and walking on the floor for a bit, I've decided to go with Chris's advice. I asked around at HD about what sort of mixture I should use. I was hoping I could find something premixed but I have the right attachment for my drill so I might as well just go for it with a fresh batch of mix. I only have to do about a 3'x5' area so I don't need too much of the stuff. I got in a bit of practice with the trowel on my first run and I have a better idea of how to avoid the same mistakes. I just hope that the stuff doesn't make the floor higher than the flange when I'm done-- but I have a jumbo wax ring with gasket flange.

I was going to try removing the whole board but I screwed it down and the compound is on top of many of the screws and I can't seem to chisel it off to get to the screws to remove it.

I'm waiting for it to stop raining. I got nothing done today because its been raining and the power went out. No power= no water so I can't wash up. Plus there is no light to see. Without lights my bathroom is fairly dark when it rains or is cloudy.

I need to figure out a better way to seal around the flange as the last effort ending up sticking to the cardboard and making chunks of it come off and stick to the floor. I am going to try to remove all of that if I can. I'm seriously thinking of getting cardboard again, wrapping it around and taping it with packing tape and a layer of painters tape and putting some PAM or cooking spray on it in the hopes the stuff won't stick to it. I'll have to find a better way to secure the part I use to block the water supply line since it was only pure luck and the fact that the mix was too thick that kept it from falling over last time.
 
Last edited:
Back
Top