I dream of the day that I understand irrigation plumbing :-)

Plumbing Forums

Help Support Plumbing Forums:

This site may earn a commission from merchant affiliate links, including eBay, Amazon, and others.

gthomson

Active Member
Joined
Jun 28, 2015
Messages
29
Reaction score
3
Location
,
I had to do a fix like this a few years ago, and I think I did okay on it, and improved with your help.
I have another similar, but a little more complex.

At which point is the water plumbing from curb to house best to then transition to junctions that
are not cemented together?

I haven't yet found a shutoff valve between curb and house, and sprinkler system seems to be in between.
So I have to shut off at the curb to deal with changes to the irrigation system.

I ended up epoxying this T, with a nipple internal, to the pipe coming up from below on the last fix -
Replaced the pipes with PVC after the photo.
http://www.gthomson.us/projects/landscaping/planter3/picc.jpg
http://www.gthomson.us/projects/landscaping/planter3/picd.jpg

I'm dealing with the same again, I think.
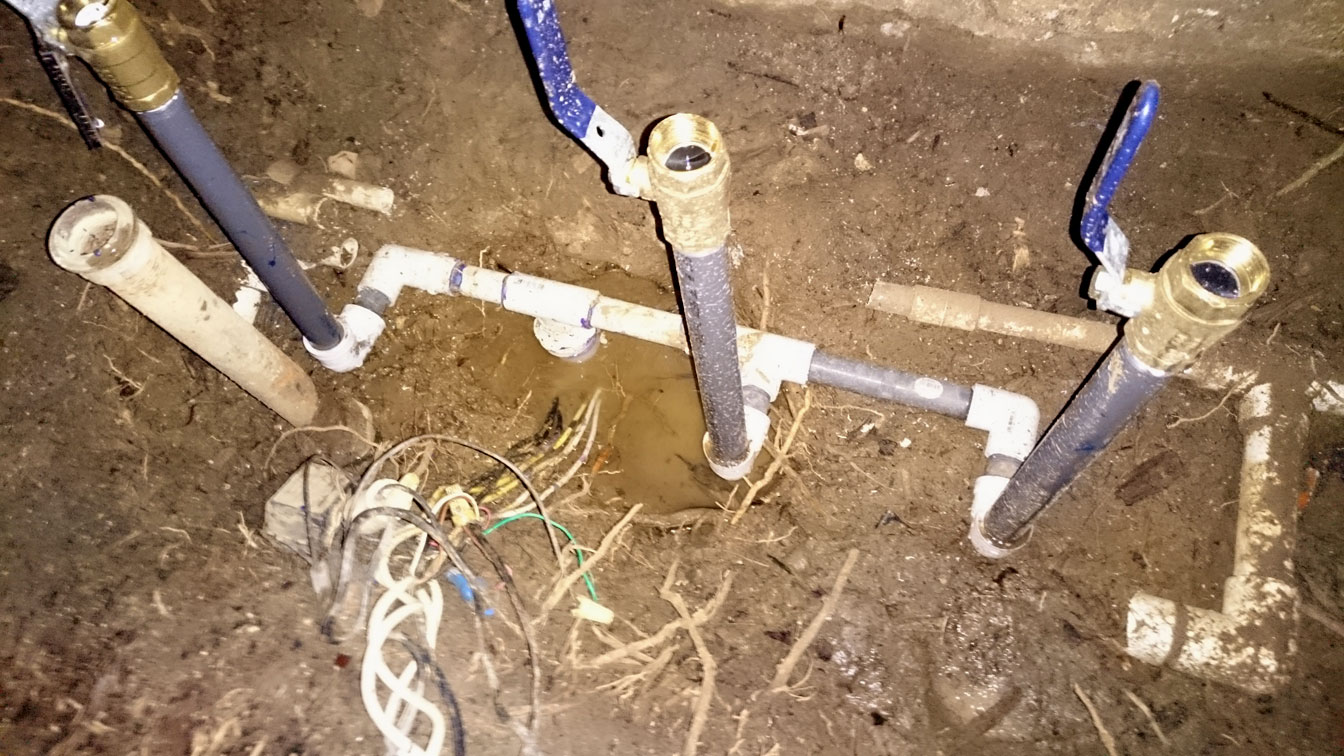
Broken nipple in a way that I can't attach anything to it, and everything beyond that is cemented towards
that T that goes down in the ground.
But this time that supply is for 3 valves, or maybe 4 with that offshoot pipe also tapped into it.

Is the best option to cut all the pipes over that T, and then bring it up above ground
- epoxy a 12" riser? - so I can put a shutoff valve there like I did in the previous fix, then take it back down and routed to wherever
needed for the valves?

My goal, I think, is to get a lever shutoff valve where that T is. Does that make sense? How best to do that?

http://www.gthomson.us/projects/landscaping/planter3/pica.jpg
http://www.gthomson.us/projects/landscaping/planter3/picb.jpg

Everything from the broken nipple to the T connection to the down spout is cemented...
 
Way too much of a mess for me to address except for a few pieces of information.
1.Plastic FEMALE fittings will always break Do not use them except at the end of a run of irrigation sprinkler heads.
2. The only material for joining PVC or the listed solvent cements. Epoxy -unless designed for joining PVC- will not be a permanent solution because there is no bond strength. Bond strength only comes from a full socket depth with chemical reaction.
 
Thank you, and sorry for that mess of a photo. As a DIY person, I got to that point and thought 'this is a mess, what am I going to do with it?'.
So I took a picture and posted, probably too soon :)

I've gotten it cleaned up a little more, started on the re-do, but possibly I've gone two steps forward, and need to go one step back.
Latest photo on it below.
I dug a little deeper, and also cut out most of the pipes on the outgoing side of the valves. Will deal with those later.
Photo is still not the best, but better.

You mentioned plastic female fittings will always break.
On my other post they did mention similar, but only said don't put metal male into plastic female.
They didn't say don't use plastic female fittings, but if I use them, also use plastic male to go into them.
So in my setup here, you would use brass elbows and T's, except for that T coming up from the underground?
Or you would also use brass for that T? For that one - brass T, threaded into a slip adapter that then goes into the PVC pipe going down?
Rather than brass for the female connections - is schedule 80 good enough?

Epoxy, chemical bond, etc...
Oh my - so many frustrations here.
And you sound like you may be able to help me understand better.
I've worked with bondo on cars - chemical reaction on the bondo side, but not between bondo and metal on the car.
I've done some Corian work, which also uses a 2-part joint adhesive -
http://www.dupont.com/products-and-...surfaces/products/dupont-joint-adhesive2.html
I got the feeling that might have some kind of chemical reaction going on with the two pieces it was joining together, but I'm not 100% sure on that.

So now with plumbing... so far the Loc-Tite marine epoxy seems really good with PVC (no disclaimer needed - I have no connection with them.)
But I don't think there's a chemical reaction going on between it and the PVC that welds them together, because it also bonds to many other materials.

How would you do this config with regards to PVC, brass, schedule 40 or 80?

And why does it always seem like the water level is 2/3/4 inches above where I want it when I'm trying to deal with these fixes?

valve-fix2.jpg
 
And that 4th off-shoot mentioned in my OP, forget about it. It was capped off a couple inches later.
 
I'm trying to epoxy my way out of this, and it's just not working.
New attempt at things tomorrow.
 
Around here in N. California, most often we have all copper as the main supply to irrigation up to the shutoff. then manifold off that single main supply.
Very often, I see the irrigation contractors use a pressure reducing valve at that point to run plastic irrigation systems (I even have seen some use a gauge in the line to prove it). Usually set to something like 35 psi.
That aside, the manifold is then built with solvent socket tees or ready-made
Schedule 80 manifold with tees.
PVC deteriorates and becomes embrittled over time both from UV and natural degradation of age as the plasticizers break down.
In your situation with pvc in the soil, I would use a sharkbite PVC x thread adapter. I am sure you would have trouble finding such a fitting. They are rare even here in the Bay Area, but I use them often since they came out.
I do wrap the sharkbite end with silicone pipe wrap as a extra step.
But you have built a clean set up there for a DIY job.
If you get this in time, one thing to help strengthen the FIP pvc is to use stainless steel hose clamps at each.
And yes, Sch 80 is way stronger.
As a homeowner, I always used to use unions on each leg of the irrigation valve because they do go bad over time and availability of parts can be tough so I just replace.
I see lots of the irrigation contractors using the new push fit PVC fittings on the irrigation side after the solenoid control valves.
Also, I have seen them using more and more of the black flexible PVC where movement or whatever warrants the flex.
 
I had to take two steps back...
For whatever reason, shutting off the water at the curb didn't keep it from flowing at a slow level even when shut off for 2 days at the curb. Maybe needs the DWP checking that shutoff valve at the curb?

1" Slip fits seemed to have too much play in that pipe going down, so the PVC cement wasn't quite getting a good seal all around.

Yet with the slow water flow not stopping, the epoxy option wasn't working either - the water would find a way through before the epoxy would ever set.

So I think, and hope, I found an option that works on this 3rd attempt.
Slip fitting with Christy's red hot blue, and Loc-tite marine epoxy, but this time I got the water flow stopped with a jimmy-rigged inflatable plug (i.e. a balloon)

So far, it's keeping the water flow from happening, so the epoxy is having the time it needs to cure.

Will screw in a nipple and cap tomorrow, and see if it leaks with the pressure then back on.

http://www.gthomson.us/projects/landscaping/sprinklers/temp-plug.jpg
http://www.gthomson.us/projects/landscaping/sprinklers/temp-plug-balloon.jpg
 
The balloon method actually gave me the time I needed to get two cemented PVC pieces in place - stopped the water for long enough to get the areas dry enough, the pieces glued up, and then 40-50 seconds of connect time together before the water would start to rise. Gave me two nice, solid, tight fits with PVC cement used.

That last attempt in the photo sprung leaks right after turning the water back on. So a 5th attempt was made this week. And I learned the second piece that was causing me such grief.

The way the joints were done initially, there was 1 1/4" PVC coming up from down under. Into that, they used epoxy to put a T into it with the slip side going inside the PVC in the ground. Bad idea from what I read this week. Slip fits going inside a PVC pipe are rare, and the measurements don't make them reliable. Slip fittings should go on the OUTSIDE of the PVC pipe. Finally found this that helped me see the problem...
https://www.pvcfittingsonline.com/resource-center/pipe-extenders-and-inside-connectors/

So my fifth and final attempt... - next week I call somebody that knows what they're doing if this one doesn't work.
This time I put a slip fit outside the 1 1/4" pipe coming up from the ground. And then a 1 1/4" to 1" reducer in that.
And I believe I got very solid, and dry - thanks to the balloons :) - fit on both of those.
Put a small nipple and cap and gave the cemented fittings 24 hours to cure.
Tomorrow will hopefully be a very good day, and I'll get a full shower once again, but not from the sprinkler pipes this time.

As long as that bottom slip coupler and reducer are good tomorrow with the water back on and pressurized, the rest will all be schedule 80, and threaded, and a piece of cake from here I think.

http://www.gthomson.us/projects/landscaping/sprinklers/fifthandlast.jpg
 
An hour under pressure with water back on this AM - no leaks, nothing blowing off... Live is good in my little world today.
 
I'm finally putting this puppy/project to rest, and I thank you all for the input on this and the other related post on teflon tape and leaks. A lot of frustrations on this project for more than two months, but mostly because of my lack of knowledge on how to do things, and you all helped me get better in that regards. I should have got some photos before filling in with dirt, but to be honest, filling in with dirt gave me closure on this project :) For what it's worth, I went with all sched 80 parts, a brass lever valve on the input side of the sprinkler valve, a coupler on the output side of the sprinkler valve, and where it wasn't slip fits, used Tplus2 on the threads, and no teflon tape. It's all good now, and now on to the wiring. But that's a whole different story - I hope to run it over wifi and ditch the wiring - but that's a project for another day.
End result... http://www.gthomson.us/projects/landscaping/sprinklers/sprinklerfix.jpg
 
thanks for the update. Love the balloon stopper. You should paten that.
 
There is a PVC cement that is for just your situation. In the industry it's called "Blue Glue". It works under water. I'm not real sure what using epoxy on PVC will do, but it's definitely not the approved method. You should also use white PVC not Grey. Grey is an electrical pipe.
 
Back
Top